by Eric Brown | Mar 4, 2016 | Attic Mold, Bleach and Mold, Dead Mold Spores, Health, Indoor Air Quality, Killing Mold, Mold Facts, Mold Information, Mold Inspection, Mold Remediation, Mold Removal, Questions and Answers
Top 4 Reasons Mold Grows In Your Attic!
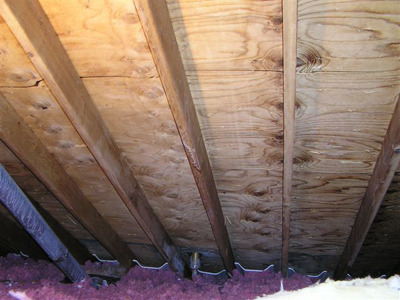
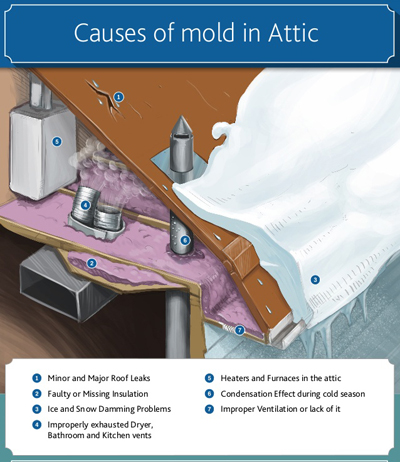
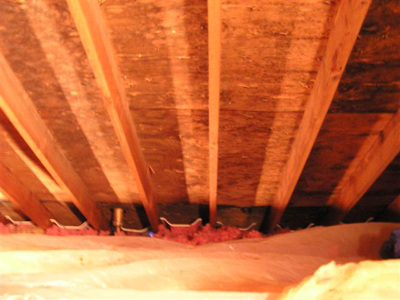
Top 4 Reasons Mold Grows In Your Attic!
Mold B Gone has been very busy this year doing many attic mold remediation projects.
The purpose of this blog is to explain why you have mold in your attic.
Four Common Causes Of Mold Growth In The Attic
Causes Of Attic Mold: A Leaking Roof
If you have a roof leak, you may see water on your floors and water stains on the ceiling. The good news, you know that you have a problem.
However, if you have a roof leak and it goes unnoticed leading to moisture accumulation in your attic, this will eventually lead to mold growth that you may not even know exists.
This is the reason it is important to inspect your attic several times each year, just to make sure that there is no moisture buildup.
- Check for discoloration of insulation and wood (e.g. rafters, sheathing, joists, attic side of fascia boards, etc.).
- Check roof valleys (i.e. where two roofs join at an angle), which are highly susceptible to roof leaks.
- Observe skylights, chimneys, attic windows and any portion of the attic/roof where dissimilar materials join each other (including flashings). These places are hotbeds for potential moisture intrusion.
- If you have a vapor barrier installed, check for condensation. Although this is not really a roof leak, it is nevertheless a sign of a moisture problem. And moisture problems lead to attic mold problems!
- Make sure there are no leaks coming from and around attic plumbing stacks.
The first step to addressing the moisture cause is to get your roof repaired, then call us to remove the mold.
Causes Of Attic Mold: Missing Insulation or Improperly Installed Insulation
The quest to save money on heating and cooling bills motivates many Do-It-Yourselfer’s to install more insulation in their attics.
Unfortunately, if the wrong kind of insulation is chosen or if it is installed improperly, this can cause moisture from the lower levels of your home to rise and get trapped in the attic.
As we have written before, the primary cause of mold growth is moisture. Your attic is made of the food mold loves to feed on.
With respect to the type of insulation, if you are layering insulation on top of other insulation, make sure you do not use the kind that has paper or foil backing because it acts as a vapor barrier and can trap moisture in the insulation.
Before you decide to add more insulation to your attic, determine if you need more first. If you are unsure, contact a professional.
Causes Of Attic Mold: Inadequate Attic Ventilation
One of the problems we have encountered in our projects is the fact that insulation is blocking the ventilation ducts that distribute air in the attic.
The lack of ventilation is another major cause of mold growth in your attic.
Air travels up to the attic meaning activities such as cooking, bathing, showering, etc will produce moisture that will makes it way up to the attic. If there is poor ventilation, the moisture gets trapped in the attic and can lead to mold problems.
Check your soffit vents and make sure they are free of insulation, bird nests, and other debris that could be blocking them and preventing proper air flow.
If you are unsure if the ventilation is ideal in your attic, contact a home inspector or give us a call so that we can take a look.
Causes Of Attic Mold: Fans Vented Into The Attic
Mold will grow if there is moisture, food, and warmth.
Poor building practices occur when the dryer vents, plumbing vents, kitchen or bathroom fans are vented into the attic.
Dryer exhaust vents, kitchen exhaust fans and bathroom exhaust fans are designed to pump moisture out of your home. Make sure that they are vented to the outside of your home and not in the attic.
Plumbing stacks in the attic can also be a source of condensation, which can lead to attic mold growth. Plumbing stacks can also emit hazardous gases, so make sure that they too do not terminate inside the attic.
If any of your vents are routed into the attic, hire a reputable contractor to re-route the vents to the outside of your house.
Why Does Mold Grow In My Attic?: Final Thoughts
Once the cause of your attic moisture issues are identified, then the next step is to determine if you have a mold problem.
Mold is nature’s recycler and will grow and proliferate when moisture is present.
Condensation in an attic, heat and humidity from household activities (cooking, showering, etc.), and the fact that the attic provides an excellent food source for mold, provides the ideal conditions.
All mold needs to grow is 24 to 48 hours and as long as the proper conditions exist, it will continue to proliferate.
If you do find mold in your attic, DO NOT use bleach or try to kill the mold!
The first step is to contact Mold B Gone for a mold inspection and air quality test.
During the inspection, tape or swab samples of suspected mold may also be taken and sent to a micro-biology lab.
Once the type of mold and spore count is determined, we will provide with a scope of work on the best way to remediate the mold in your attic.
Questions? Call 678-697-6267 or send us an e-mail. We look forward to serving you! 🙂
What’s Lurking In Your Attic Infographic

What’s Lurking In Your Attic Infographic

by Eric Brown | Feb 26, 2016 | Bleach and Mold, Can Mold Kill?, Chronic Inflammatory Response Syndrome (CIRS), Health, Indoor Air Quality, Killing Mold, Mold Facts, Mold Information, Questions and Answers, Sippy Cup Mold, Toxic Mold
Mold Found In Sippy Cups!
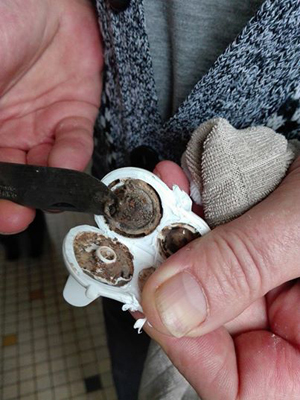
Mold Found In Sippy Cups!
“My friend wondered why his son was still sick so he broke open the anti-spill guard of his Tommee Tippee glass and discovered mold inside the anti-spill top that you can’t see except if you break it open….He has washed it with his hands and in the dishwasher and the mildew has stayed anyway.(Penny Powell)”
Yesterday there were many news reports about mold being found in Tommee Tippee sippy cups.
Outraged parents are using social media to share photos of moldy Tommee Tippee sippy cups and calling for the manufacturer to investigate the potential health harm.
Tommee Tippee addressed the issue on their FaceBook page:
“We are always very attentive to your feedback, comments, ideas and the way in which the parents use our products and their children the experience….We understand that the well-being of your children is of paramount importance, and we assure you that we have tested the valves of our cups, and the results have clearly confirmed that when the instructions for use and cleaning are followed, all works correctly. In addition to our instructions for use of cups, we have prepared a list of FAQ to help you to clean your cups and their valves.”
The company recommends the cups only be used with cold fluids, including water and non-pulp juices, rather than thick or warm liquids, such as milk or pulpy juices.
Regardless of the brand or origin of your child’s sippy cup, we recommend that you check to see that mold is not building up. The remainder of this article explains why mold could make your child sick, why mold grows on sippy cups, and how you should properly clean the sippy cup.
Can Mold In The Sippy Cup Make Your Child Sick?
Mold exposure can cause nasal stuffiness, throat irritation, coughing or wheezing, eye irritation, or skin irritation. Mold exposure has also been linked to 37 conditions associated with Chronic Inflammatory Response Syndrome.
Mold can also produce Mycotoxins, which are poisonous substances produced by mold.
With respect to mold in the sippy cups, this may make your child sick, causing coughing, wheezing, and other respiratory conditions. The other major concern is that if there is mold, then the sippy cup could be contaminated with bacteria that could also cause sickness.
Why Does Mold Grow In Sippy Cups?
Mold needs four ingredients to grow:
- Mold Spores.
- Temperature.
- Moisture.
- Mold Food.
Since mold spores are everywhere and not visible to the eye, sippy cups can easily become contaminated with mold spores, meaning there is not much you can do to prevent this.
The only way to prevent mold from growing in your children’s cups is to properly clean them to reduce traces of food.
The other key is to eliminate all moisture after cleaning the cup.
Cleaning Tips To Keep Your Child’s Sippy Cup Mold Free
NuspinKids, another manufacturer of sippy cups, has some excellent cleaning tips on their website.
They recommend the following:
- Wash the cup immediately after each use.
- FULLY disassemble the cup. Moisture and food collects in the joints between parts, and is exactly the type of place where mold can grow. Separate all straws, valves, rubber rings, plastic sliding covers, and so on. Use a straw brush to scrub inside straws. Use a straw brush or a toothpick to scrub inside valves.
- Pre-rinse straws, valves, and other parts that collect food with warm water. Most rubber valves can be opened by pinching with your fingers. Pinch the valve and run water through it to pre-rinse.
- Wash by hand in warm soapy water, or by dishwasher.
- Shake out remaining water from all parts. Shake out any water collected inside straws. If your cup or straw has a rubber valve, pinch it open while you shake to get the water out.
- FULLY dry all parts before assembly. This is a key step, since moist parts won’t dry once assembled. Consider storing the cup disassembled, and assemble only when ready to use.
To further guarantee your child’s sippy cups are extra clean, on a weekly or monthly basis you may want to use these advance sterilization techniques:
- Washing in a dishwasher will sanitize, and some hotter dishwasher cycles can even sterilize. The dishwasher is often the best solution for keeping your cups extra clean without exposing them to excessive temperatures and harsh chemicals that can deteriorate plastic, rubber, steel, and paint.
- A steam sterilizer is effective for killing mold. As with all methods, you must ensure that the parts are fully dried afterwards, so use the dry cycle if available.
- A diluted chlorine bleach bath (typically 1 tablespoon of bleach per gallon of water, soak for 2 minutes) is effective. If you do this proceed with caution. Don’t mix bleach with ammonia, vinegar, hydrogen peroxide, or other household cleaners, ensure proper ventilation by opening windows, and thoroughly rinse and clean all the cup parts.
- A vinegar bath can help to clean grime, but isn’t effective enough to meet the technical definition of sterilization and will only kill about 70% of the mold.
What You Should Do If You Own A Tommee Tippee Sippy Cup?

What You Should Do If You Own A Tommee Tippee Sippy Cup?
If you own a Sippee Cup with a one-piece valve, Tommee Tippee will send you a transparent valve (pictured above), which can give you the confidence that the cup is clean every time, or a new cup can be selected entirely. Consumers are asked to call 1-877-248-6922 to receive either of these free options.
In addition, Tommee Tippee has some great cleaning tips and videos on their website to keep your child’s sippy cup clean and mold free.
Questions about mold? Don’t hesitate to contact us. We are mold experts that understand why and how mold grows. 🙂

by Eric Brown | Feb 12, 2016 | Air Conditioning, Beware Of Mold When Buying A Home, Can Black Mold Poison You?, Can Mold Kill?, Crawlspace Mold, Health, Indoor Air Quality, Mold Facts, Mold Information, Mold Inspection, Mold Remediation, Mold Removal, Mold Removal Cost, Mold Sensitized Success Story, Questions and Answers, Stachybotrys Black Mold, Toxic Mold
Interview With Jack and Helen Graham: Mold Sensitized Success Story

Interview With Jack and Helen Graham: Mold Sensitized Success Story
For the past four years, I suffered from upper and lower digestive issues, extreme fatigue, and weakness. I was diagnosed with the lethal condition, idiopathic pulmonary fibrosis (unknown cause, hence no treatment). Later it was determined that the fibrosis was caused by acid reflux, which is treatable. I began to have difficulty breathing, which made me question the quality of our indoor air. The link between my health problems, poor indoor air quality and mold seems to be confirmed by the fact that when the house was retrofitted with new equipment and extensively cleaned my symptoms have largely been alleviated. Medical tests have shown improvement in my breathing and improved lung health. (Helen Graham)
The whole purpose of the Remediation for Sensitized Individuals course is to help sensitized individuals live healthier and better lives.
Johnny Wells, owner of Mold-B-Gone, invested in the training from Wonder Makers Environmental so that he can offer a higher level of service and expertise to individuals suffering from mold related illnesses. Johnny also works with Stephen Andrews of HealthyAirUSA, another graduate of the course. Together, they are serving the needs of mold sensitized individuals in Atlanta, Georgia and surrounding areas.
Below is an interview with Jack and Helen Graham, who hired Mold-B-Gone and HealthyAirUSA, to investigate the indoor air quality of their home and most importantly remediate the mold and make sure that the indoor air quality contributed to their health and well-being.
1. When was mold identified as the cause of your sickness?
17 years ago we moved into our 2800 square foot three story dream home, which was approximately 30 years old. We are very fastidious with the cleaning and maintenance of the home.
Within two years of moving in, we began to find leaking issues with sewer pipes and other pipes in the home. In addition to fixing these issues, over the years we also installed a new roof, flooring, chimney, outside exterior, windows, and doors. We even hired a restoration company to remediate some mold and dry out other areas in the home.
Despite our efforts to fix moisture issues and remediate mold, Helen’s health continued to deteriorate.
In Helen’s words:
“For the past four years, I suffered from upper and lower digestive issues, extreme fatigue, and weakness. I was diagnosed with the lethal condition, idiopathic pulmonary fibrosis (unknown cause, hence no treatment). Later it was determined that the fibrosis was caused by acid reflux. I began to have difficulty breathing, which made me question the quality of our indoor air.”
2. What caused the mold in your house?
The mold was not obvious. We had noticed there was more dust on our furniture, though we were keeping our furniture and interior surfaces very clean.
When the Mold-B-Gone specialists inspected our home they used high intensity lights shown at an angle and on nearly every surface there were tiny specks of white mold spores.
What we learned is that in any home here in the South where the humidity is almost always above 70% and where homes are air-conditioned, mold invariably exists, no matter how much one cleans. This is even more prevalent in older homes.
3. What remediation contractor did you use?
“After 71 years of health and physically energetic living, I experienced fatigue, shortness of breath, and bodily pains. A colleague I worked with 7 years ago was so sick and weak she had to crawl up her home stairs. After seeing her early this year, she was energetic, enjoying her career and family, and looked wonderful. We had switched places: she was healed, and I was quite sick. Her thriving health seemed miraculous, so I asked her how she became well.”
Initially we had another mold removal specialist do an inspection of our home. He took pictures inside the ducts and above the drop-down ceiling and wanted to remove all the ducts and air flow systems. The estimated cost was $59,000 and the time for completion was two months.
The price, time, and other factors seemed high. We felt scare tactics were employed hearing twice the unacceptable statement, “I am sure you want your wife to live, don’t you?” Both of us decided not to hire that company.
Helen’s condition continued to worsen. Luckily, one of Helen’s colleagues, who had chronic debilitating effects from mold, recommended HealthyAirUSA and Mold-B-Gone.
After their work was complete, her health improved dramatically.
Specifically, we hired them for three key reasons.
First, their assessment of the problems was thorough and very professional. They used specialized equipment to measure humidity and moisture levels in each area of the home.
Second, they educated us on the different types of mold and fungi and explained how they would resolve the problem. There is no shame in having home mold. We always thought homes get mold if they are not cleaned properly, so we have been conscientious about maintaining the cleanliness of our home.
Finally, the cost was reasonable. The total cost for remediation, including new equipment not proposed by the first remediator, was $22,000, and it would only take 6 to 8 days!
4. How long did it take for the work to be completed?
We were impressed by the persons in the crew, and enjoyed their professionalism, competence and respect for our home. We enjoyed being with them in the mornings before we left for work.
The work was finished in 8 days, as they predicted. They worked Wednesday, Thursday, and Friday to overhaul all the air flow systems and returned the next Monday for 5 days to clean every object in the home. We had the weekend to ourselves, which seemed miraculous to us!
They explained in advance exactly what was going to happen and did not miss a beat in holding to their schedule.
They completed the job exactly as they said they would. We were introduced to every person who came into our home, and given a full appraisal of their experience.
At the end of the job they checked the air quality in every room to ensure that the fungal ecology was at healthy levels.
5. What difference do you think it made working with a mold sensitized trained contractor?
Both of us noticed the effects of clean air immediately.
It made all the difference in the world to have a mold-sensitized trained contractor!
They knew what needed to be done. Both mold remediation, as well as the machinery and air circulation that were needed to cleanse the air and keep humidity at 40%, so mold could not be present.
They said that the air quality in the Master Bedroom was “surgical room quality.”
The air just seems “pure,” “fresh,” “hygienic,” “blue—if that is an image of cleanliness.”
We still have our house cleaned every two weeks, but the accumulation of dust is a tenth of what it was.
Perhaps the sense of the air quality is physiological, perhaps it is psychological, but Helen feels her breathing and energy are much better. I (Jack) have always grown up in old musty-smelling houses, but now that we have become educated about the harmful effects of mold, we are most grateful for the quality of this home improvement, and for the trust that we have experienced in the people who did this work.
6. What were the main steps/processes involved in the remediation?
After we made the decision to get the work done, we met with Johnny of Mold-B-Gone and Stephen of HealthyAirUSA as soon as possible. They told us that it would take 6-8 days and were very clear about what would happen on each day. We had assumed we would have to move out while the work was being done, yet they said that would not be necessary…what superb news!
With respect to specific steps, this is what they did.
They brought in a top tier duct cleaning service using 10,000 lbs of suction pressure. Then the edges of every duct opening where it meets the ceiling, were sealed. A large HEPA Air Cleaning system was added above the Master Bedroom. Then a large dehumidifier was added to dry out the entire house and keep the humidity of the house at a constant 47 percent, a level where no mold can grow and yet the wood does not dry and crack. The ceiling tiles in the lower level were all removed and cleaned on both sides and re-installed, the wood joists and all surfaces were coated with a mold preventative.
Once this step was completed, Mold-B-Gone brought in their team of five technicians who did a basement to roof cleaning of every surface and object, wiping every surface with a mold prevention cleaner developed by Johnny Wells. They were meticulous, cleaning every lamp, every object, every picture, every piece of furniture turned upside down, every drawer removed, emptied, cleaned, the contents cleaned, every one of about 3000 books individually cleaned. They took particular interest and care in cleaning about 60 antiquity objects dating from 5000 BCE to about 850 CE. This process took five days and they cleaned 12 rooms, including the garage.
For added “peace of mind”, there was a site supervisor that ensured that each step documented for us was followed through upon.
7. Further thoughts?
We highly recommend HealthyAirUSA and Mold-B-Gone because of the care and respect they demonstrated for the contents of home. Most importantly, they were easy to work with, friendly, and did an exceptional job.
Months after they were finished, Mold-B-Gone returned to investigate the mold on the caulking of the master shower. When Johnny and his staff supervisor, Rick, arrived it was liking seeing cherished friends. They are excellent professionals, fun and down-to-earth. They removed the contaminated caulking and re-caulked the shower and even brought ladders in to replace light bulbs in the hall entry at no extra cost.
Working with them was a marvelous experience because of their attitude, work ethic, and outstanding work. We have already referred friends and family to Mold-B-Gone and HealthyAirUSA because of their exceptional service.

We highly recommend Mold-B-Gone because of the care and respect they demonstrated for the contents of our home. Most importantly, they were easy to work with, friendly, and did an exceptional job!
Have A Mold Concern?
Call 678-697-6267 or use the form below!
[contact-form to=’sanjay@moldbgonega.com’ subject=’Mold B Gone Lead’][contact-field label=’First Name’ type=’name’ required=’1’/][contact-field label=’Last Name’ type=’name’ required=’1’/][contact-field label=’Phone’ type=’text’ required=’1’/][contact-field label=’Email’ type=’email’ required=’1’/][contact-field label=’Message’ type=’textarea’ required=’1’/][/contact-form]
by Eric Brown | Feb 5, 2016 | Basement Mold, Crawlspace Mold, Health, Indoor Air Quality, Mold Facts, Mold Removal, Questions and Answers, Toxic Mold
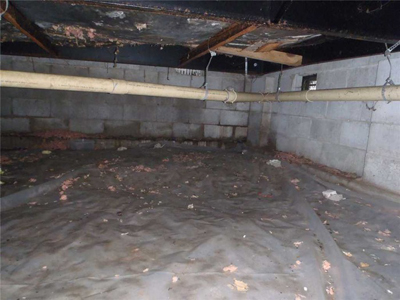
Top 3 Reasons Your Crawlspace Has High Humidity
Top 3 Reasons Your Crawlspace Has High Humidity
Crawlspaces are the ideal environment for mold to thrive.
Most crawlspaces are dark, dirty, and humid. Bugs like to live in there. They’re vented to the outside air in the summer (and in the winter if you neglect to close your vents) which can be very humid and this defeats the purpose of venting.
Mold is a fungus that requires moisture and high humidity to grow and thrive.
Like plants, mold has cells. However, unlike a plant that has chlorophyll and able to makes it’s food through photosynthesis, mold can not feed without moisture.
Mold reproduces by releasing it’s spores, this is mold’s survival mechanism.
In addition to moisture, mold also requires the right temperature of 41 degrees fahrenheit up to 100 degrees fahrenheit, common in Atlanta, Georgia and the South.
The final ingredient mold needs to thrive is food: high cellulose materials such as paper and wood, drywall, wallpaper, carpet, ceiling tiles, dust, and dirt.
Now that you understand why mold grows in your crawlspace, the remainder of this article will list and explain the top three reasons why you have moisture in your crawlspace and what you can do to fix the humidity issues.
How To Measure The Relative Humidity Of Your Crawlspace?
The easiest way to determine the relative humidity of your crawlspace is to use a hygrometer or you could install a digital thermo-hygrometer with a remote sensor to track it.
If the relative humidity is greater than 50% this could cause moisture issues that leads to mold.
Mold will begin to grow at 50%, and will thrive when the humidity is greater than 70%.
The key to ensuring that your crawlspace does not become a source of mold is to figure out how to control the humidity.
Listed below are the top three reasons your crawlspace has high humidity.
#1 Water Accumulation
If your crawlspace has standing water, you probably have a drainage problem or a plumbing leak. This needs to be fixed immediately.
You do not want water to accumulate in your crawlspace because this will compound your potential mold problems, not to mention as mold grows it will impact the indoor air quality of your home and health.
#2 Moisture Evaporating from the Ground
When homes are built with crawl spaces, most builders neglect to cover the ground, meaning that the crawlspace is covered with dirt.
Dirt has moisture and as the moisture evaporates, it will increase the humidity in your crawlspace.
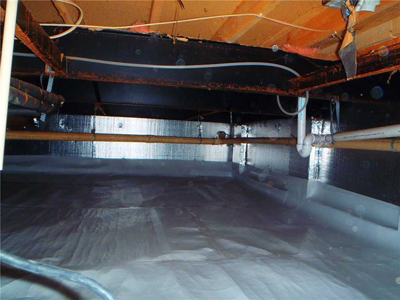
Unfortunately, this is a common problem in Atlanta, Georgia, and other southern states. To prevent moisture from evaporating from the ground, the easiest solution is to cover it up with a vapor barrier during crawlspace encapsulation.
#3 Outdoor Air Coming in through the Crawl Space Vents
The third reason your crawlspace could have moisture issues is through the vents.
When you bring outdoor air into the crawlspace, the relative humidity can increase.
Cool air cannot hold as much moisture as warm air, so the air that enters is now closer to its saturation point, referred to as the dew point.
It might be 60% relative humidity outside, relative to a temperature of 90 degrees fahrenheit, but when that air enters the crawlspace and cools down to 75 degrees fahrenheit, the relative humidity jumps up to 95%.
In the past, we were told that crawlspaces needed to be ventilated. Now, however, we are learning that crawlspaces need to be treated almost as if they were living spaces. In other words, areas that are in contact with your living space affect your living space.
Fixing Your Crawlspace Humidity and Mold Problems
If your crawlspace is vented and the relative humidity is high, you need to fix the problems. It is not as simple as installing a dehumidifier either.
If you have water accumulation, the source of the water must be addressed. If it is a plumbing issue, fix the leak. If the problem is caused by drainage, this must be fixed as well.
If the problem relates to moisture evaporating from the ground or outdoor air coming into your vents, this can be fixed with crawlspace encapsulation.
Mold-B-Gone Remediation, LLC specializes in drying out damp crawlspaces and turning them into dry, healthy foundations for your home.
Our dry-space crawlspace system includes the following:
- Thorough cleaning of the crawlspace, including mold removal and prevention.
- Installation of a wall-to-wall guide, durable, 14 mil vapor barrier.
- Attachment of the vapor barrier over ground and up sidewalls to 6 inches below floor joists.
The end result is an energy efficient, healthy home.
If you are concerned about humidity in your crawlspace, call 678-697-6267 or send an e-mail. We look forward to serving you! 🙂
by Eric Brown | Jan 25, 2016 | Basement Mold, Beware Of Mold When Buying A Home, Flood Clean Up, Health, Indoor Air Quality, Killing Mold, Mold Facts, Mold Information, Mold Inspection, Mold Remediation, Mold Removal, Mold Removal Cost, Questions and Answers, Top 15 Mold Prevention Tips, Toxic Mold, Water Damage Restoration
The Key To Mold Prevention Is Moisture Control!
The Key To Mold Prevention Is Moisture Control!
Mold spores are all around us, outside and indoors. Mold actually serves a purpose in our eco-system to consume dead organic materials.
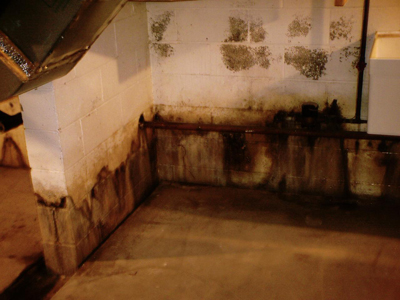
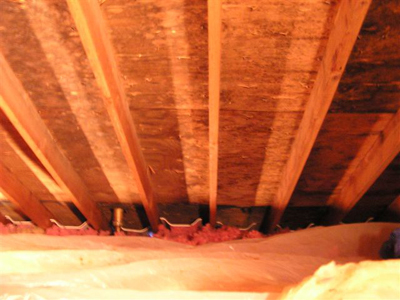
Problems with mold arise indoors primarily because our homes are made of dead organic materials, meaning mold can grow anywhere in your home: on carpet, clothing, food, paper, and even in places you can’t see, such as the backside of drywall, areas inside walls around leaking or condensing pipes, and above ceiling tiles.
The simplest way to detect a mold problem is using your own senses. A musty odor is one indication. Not only is mold smelly, but can be many different colors from black and gray to orange and green. Watermarks on the ceiling and walls are also a telltale sign.
There are two key reasons, you should be concerned about preventing mold.
First, mold can be difficult and costly to remove.
Second, mold can produce allergens, irritants, and mycotoxins that can compromise your health. Because mold spores are very small and can easily be inhaled into the lungs, it is harmful to live in a home with high mold levels.
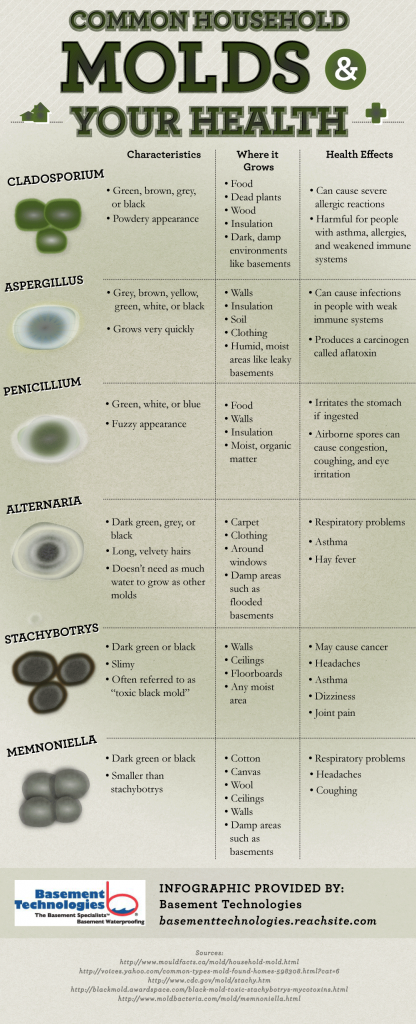
Mold Can Compromise Your Health
Mold growth can be prevented. Mold growing in your home requires moisture, warmth, and food. Depriving mold of any of these three items will stop it from growing, but it will not kill the mold that is already there. Mold spores will remain dormant, and if the moisture, warmth and food all reappear, mold will begin to grow again.
So what can you do if you’re concerned about mold growing in your home?
Listed below are the top 15 mold prevention tips.
The Top 15 Mold Prevention Tips
Mold Prevention Tip #1: Audit Your Home For Problem Areas!
It is difficult to mold-proof a home. However, you can take proactive steps to determine if you have problems that could lead to mold concerns.
Does the basement flood?
Do you notice frequent condensation on windows?
Is there a water stain on the ceiling from a persistent leak?
Is your basement damp?
Does water flow into your home’s foundation?
Addressing these questions may entail some upfront costs to fix, but it will be worth the investment in preventing future mold problems.
It is also important to note that if you are renovating your home or considering building a new home, that you may want to consider researching mold prevention products, including mold-resistant drywall and sheetrock, and mold inhibitors for paints.
Mold-resistant drywall is recommended because traditional drywall is made up of gypsum plaster core pressed between piles of paper, making it highly susceptible to mold. What this means is that in the presence of moisture and water, traditional drywall acts like a sponge absorbing the moisture leading to mold. Since traditional drywall is so porous, the only remedy to removing the mold is to tear out the drywall.
In contrast, mold-resistant drywall is paperless because the gypsum core is covered in fiberglass, meaning it is water-resistant and therefore less susceptible to mold growth. Moisture resistance drywall should be used in bathrooms, laundry rooms, basements, and kitchens because these areas of the home are most prone to moisture.
Mold Prevention Tip #2: Dry Wet Materials Immediately!
Mold can not grow without moisture and given the right conditions, it will begin growing within 24 to 48 hours.
With this in mind, tackle we areas right away.
- Don’t leave wet clothes or other items lying around the house, dry them outside if possible.
- Dry spills on carpet and floors.
- Dry your clothes after washing them by putting them in the dryer soon after the wash cycle is complete.
- If heavy rainfall causes seepage into your basement, make sure you dry the area promptly and contact a company to waterproof your basement to prevent future occurrences.
- If you experience a flood event, dispose of water-damaged carpets, bedding, and furniture if they can not be dried completely. Ideally, contact a restoration company to manage the clean up and drying process.
Mold Prevention Tip #3: Clean, Disinfect, and Dry Surfaces!
Vacuum and clean regularly to remove possible sources of mold growth.
Pay special attention to bathrooms and other areas of your home that are likely to generate a lot of moisture.
Non-porous surfaces (tile, stone, laminate) can be cleaned well with disinfectants and other cleaners.
Mold Prevention Tip #4: Repair Water Leaks!
Repair water leaks in your roof, windows, or any other part of the home as soon as possible.
Over time, constant leaks will cause moisture to buildup leading to mold growth.
Mold Prevention Tip #5: Use Area Rugs!
In portions of your home that are susceptible to moisture, use area rugs or washable floor surfaces rather than wall-to-wall carpeting. If you use area rugs, launder them periodically.
Mold Prevention Tip #6: Increase Air Flow!
Prevent moisture buildup by increasing the air flow within your home. Without good air flow, excess moisture can appear on your walls, windows, and floors.
To increase air circulation, open doors between rooms, move furniture away from walls, and open doors to closets.
In addition, open windows to allow fresh air to flow indoors.
If you don’t already have an HVAC system that has an outside air intake to bring in a steady stream of outside air, consider installing one.
Mold Prevention Tip #7: Proper Ventilation!
Routine daily activities such as cooking, taking a shower, and washing laundry can create excess moisture in your home.
Prevent moisture with proper ventilation.
Vent appliances that produce moisture (clothes dryers and stoves) to the outside, not to the attic or crawl space.
Use AC units and dehumidifiers (especially in humid climates), but make sure they don’t produce moisture themselves by checking them periodically and cleaning them as directed by the manufacturer.
Energy-efficient homes are prone to holding moisture inside. For this reason, it is important that you open windows or use exhaust fans in the kitchen and bathroom (especially when you are showering).
Mold Prevention Tip #8: Make Sure Your Storage Room Is Dry!
Most homeowners have a room where they store materials such as books, clothes, camping gear, and other occasional use items.
It is important that you check the humidity of your storage room and make sure that there is no excess moisture because most of the materials you are storing are ample sources of food for mold.
Ideally, use your garage, a well built shed that prevents moisture intrusion, or a dry storage unit and not the inside of your home. Make sure there is air circulating in the storage area as well.
Mold Prevention Tip #9: Control Humidity!
Clues that your home has excess humidity include condensation on windows, pipes, and walls. If you notice condensation, dry the surface immediately and address the source of moisture, and invest in a dehumidifier if necessary.
To measure the humidity levels in your home, purchase a moisture meter from your local hardware store.
Ideally, the indoor humidity of your home should be between 30 and 60 percent.
In the winter, it is recommended that humidity levels are below 40 percent to prevent condensation from appearing on the windows.
Mold Prevention Tip #10: Check Your Attic!
Make sure that your exhaust fans are not venting into the attic because this will create excess moisture and lead to mold.
Also, your attic needs ventilation as well, so check this.
Insulation is important, particularly in cooler climates because snow accumulation on the roof can lead to ice damning issues which will cause moisture issues.
Mold Prevention Tip #11: Check Your Crawl Space!
Most homes in the Southern United States have crawl spaces.
Crawl spaces are a breeding ground for mold because there is so much excess humidity.
Mold growth in the crawl space is a particular concern because it will also impact the indoor air quality of your home.
If you find excess moisture or mold issues in your crawl space, then the area should be cleaned properly and the mold removed. To prevent future mold issues, wall-to-wall guide, durable, 14 mil vapor barrier should be installed over the ground and up sidewalls to 6 inches below floor joists. Installation of a dehumidifier will also help control humidity.
Mold Prevention Tip #12: Prevent Basement Condensation!
The cool basement floor and walls can be a source of moisture build-up, leading to mold and that musty smell many encounter in their basements.
To prevent condensation and future moisture issues, improve air circulation, run a dehumidifier, and install a foundation drain.
Ideally, make sure the basement walls are insulated properly to keep the walls warm and limit condensation.
As a final note, if you find that there is moisture intrusion into your basement through seepage, consider hiring a contractor to water proof the area.
Mold Prevention Tip #13: Direct Water Away From Your Home!
One of the best methods to prevent seepage into your crawlspace or basement is to ensure that water around your home sufficiently slopes away from the foundation of your home.
Do not put gardens or plants too close to your foundation so that watering them could cause water to flow toward your house.
If you water your lawn with a sprinkler, make sure the water does not hit your house or the area next to the foundation.
Mold Prevention Tip #14: Keep Your Gutters and Downspouts Clear of Debris!
Debris in your gutters or downspouts could block the flow of water from your roof. To prevent water accumulation, clean your gutters regularly and have them inspected for damage. It is also a good idea to check your ceiling for water stains, particularly after heavy storms.
In addition, make sure the area under your downspouts is properly graded so that rainwater from the roof flows away from your foundation. If the water is not flowing away from the foundation, extend your downspouts.
Mold Prevention Tip #15: Check Your Plants For Mold!
Plants help keep your indoor air clean. Unfortunately, mold grows in the soil of house plants and can also grow on the leaves, leading to higher levels of mold spores in the home. To hinder mold growth in plant soil, add some Taheebo tea to your house plant water in a mild solution. The oil of this tree, which withstands fungi even in rain forests, helps hinder mold growth in plant soil and can be found at natural food stores.
Questions? Mold B Gone is here to help. We are mold removal and mold prevention specialists backing our services with a minimum guarantee of 1 year. Call 678-697-6267 or send us an e-mail.
The infographic below is an exceptional summary of mold. Enjoy!

Mold Summary
by Eric Brown | Jan 15, 2016 | Air Conditioning, Basement Mold, Bleach and Mold, Can Black Mold Poison You?, Can Mold Kill?, Chronic Inflammatory Response Syndrome (CIRS), Flood Clean Up, Health, Indoor Air Quality, Killing Mold, Mold and Asthma, Mold and Depression, Mold and Multiple Sclerosis, Mold and Parkinson's Disease, Mold and Sinusitis, Mold Facts, Mold In Apartment, Mold Information, Mold Inspection, Mold Remediation, Mold Removal, Questions and Answers, Stachybotrys Black Mold, Toxic Mold, Water Damage Restoration
Steps Residents of Georgia Can Take If They Have Mold In Their Apartment!
Steps Residents of Georgia Can Take If They Have Mold In Their Apartment!
In the past month there have been two high profile stories in Georgia concerning the issue of mold in apartments:
- Renter says childrens’ safety jeopardized due to possible mold in apartment.
- Commissioner takes apartment mold problem into his own hands.
The purpose of this article is to explain what steps you can take if you have mold in your rental property.
Why Is Mold One of the Biggest Concerns of Tenants In Georgia?
Based on a tenant review website, the five most common complaints of tenants include the following:
- Unfair bond claims
- Black mold
- Illegal landlord access
- Severe water damage
- Attitude toward tenants
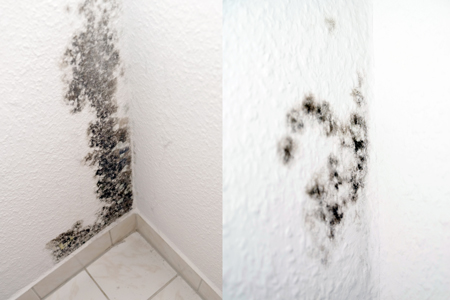
An environmental hazard, mold is a type of microscopic fungi that thrives in moist conditions, and is very prevalent in humid climates. It grows on any organic material including wood, paper, drywall, tiles, wall paneling, paint, rugs and fibers.
Colonies of mold, like like stachybotrys, penicillium, aspergilus, paecilomyces, and fusarium, can cover a large area and are usually black, white, grey, brown, green, or gray. Some molds are powdery or shiny and can give off a musty or mildewy smell. Unfortunately, not all mold is visible and can be hidden or covered in the areas such as a vent; underneath a refrigerator, radiator, or sink; under the floor or a ceiling; or behind a wall.
Common causes of moisture include the following:
- leaky pipes or radiators (including leaks that occur between the walls or floors);
- broken or poorly sealed windows;
- a damaged roof;
- a damaged or deteriorated section of brickwork or the building’s facade;
- water coming from a neighboring apartment (leaks; regular spilling or flooding);
- air ducts;
- poor ventilation, especially in a bathroom;
- standing water (such as in a basement);
- flooding
There are two key problems caused by mold. First, it damages the surfaces it grows on, which could eventually cause structural problems. Second, it can also cause serious health problems. Depending on your sensitivity to mold and the extent of the mold growth, you may be forced move out of your apartment if mold is present.
Inhalation of mold spores released into the air can cause illness. Some molds cause serious health concerns, especially for young children, the elderly, and those with compromised immune systems.
Healthy people constantly exposed to mold can also develop severe illnesses and allergies when exposed to mold.
Illnesses related to mold growth include allergic reactions (fever, itching, rashes, eye problems, breathing difficulties, etc), chronic fatigue, chronic sinusitis, nausea, diarrhea, headaches, nose bleeds, cognitive losses, asthma, and severe respiratory problems.
Severe illnesses, including hemorrhaging lungs, is caused by mycotoxins, chemicals produced by some harmful molds–mycotoxins can induce allergies and chronic, severe health problems in previously healthy people.
Considering all the potential health problems mold can cause, here are some research tips you may want to consider when you are searching for an apartment.
Steps To Avoid Mold Problems When Renting An Apartment In Georgia
One of the biggest steps you can take to avoid mold concerns is to properly research your rental before committing to a lease with a landlord.
Consider these factors in your research:
- Basement apartments tend to be more prone to damp and moisture issues, so if mold is a concern, you may want to avoid renting this type of unit.
- If you are renting in a multi-story building, find out if there have been any flooding issues in the basement. If so, best to avoid renting because if the building had a wet basement, there could be mold growing and since the HVAC system is located in the basement, mold spores will circulate in all units.
- Check the unit for bathroom and kitchen fans. If there are none, then do not rent the unit because the building will likely have moisture issues and mold.
- Ideally, rent a unit without carpet. However, if you are considering renting a unit with carpet, find out how old it is and if possible, get the landlord to change it before you move in.
- Try to find out as much about the building history, specifically, does the building have a history of roof or plumbing leaks. If so, avoid renting because there will undoubtedly be mold.
Bottom line, as the tenant you are the customer of the landlord, so you have the right to choose who you rent from and should do your due diligence before you rent.
The infographic below, courtesy of Rocket Lawyer, emphasizes the need to do your due diligence before signing a lease and the necessity of creating a paper trail in the event of a future dispute.
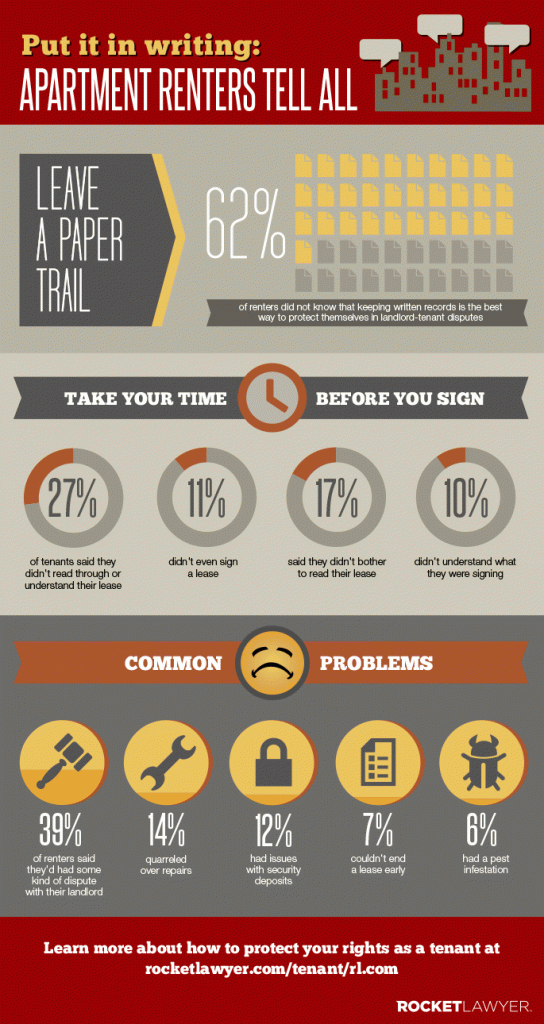
Steps To Avoid Mold Problems When Renting An Apartment
Landlord/Tenant Responsibilities In Georgia
Generally speaking, as a tenant you have the right to live in a clean and habitable environment. Your landlord is responsible for offering you a safe environment to live in and must repair issues such as leaky pipes, roofs, and windows, which could create moisture issues that lead to mold.
Regardless of where you live, you should expect the following from your landlord:
- Follow all health and safety laws so the building, apartments, and common areas are safe. (Common areas include the driveway, yard, halls, and laundry rooms.)
- Make all repairs needed to keep your apartment fit and livable.
- Keep all electrical, plumbing, heating, ventilation, appliances, and other landlord supplied features, such as elevators and appliances working and safe.
- Provide containers for trash and arrange for its removal.
- Supply heating, running water, and hot water.
- Repair cracked, chipped, or peeling paint.
- Remove paint that contains dangerous and illegal amounts of lead. Lead is very dangerous for small children and pregnant women.
As a renter, you should:
- Follow all housing and fire codes that apply to you.
- Keep your apartment as clean and safe as possible, including sinks, toilets, tubs, and appliances.
- Put all trash in the containers supplied by the landlord.
- Use all services and facilities, such as the elevator, laundry room, and heating, reasonably.
- Not destroy, damage, or take any property or allow anyone else to do so. You may have to pay the landlord if you or your family or guests cause damage that is more than normal wear and tear.
- Not disturb your neighbors or allow any of your guests to do so.
- Obey all of your landlord’s rules if they are reasonable, clear, apply to all tenants, and you were told about the rule(s).
- Pay the rent, even if your apartment needs repairs, unless the court says otherwise.
- Let the landlord into your apartment, if the request to go in is reasonable.
Landlord / Tenant Mold Dispute Resolution Steps In Georgia
“If there’s one thing a renter should do, it is properly documenting the condition of the unit during the pre-move-in inspection. Tenants may be quick to check all the boxes saying everything is fine, and landlords will use that against a tenant later or when a request for repair is made. Renters need to keep in mind that they have basic rights to have their unit maintained in good condition. A landlord can’t force you to “give up having a working heater” or take the unit “as-is” when there are known problems. Tenants can demand repairs even if they signed provisions to that effect. Tenants often worry about rocking the boat and getting asked to leave if they complain. It is illegal for a landlord to retaliate against a tenant simply because a tenant is requesting repairs.” (San Francisco landlord-tenant attorney Michael Bracamontes)
There would not be a need for lawyers, if all disputes between landlords and tenants could be settled amicably. Unfortunately, there are no federal laws that set permissible exposure limits or building tolerance standards for mold in residential buildings in the United States, so the legal recourse you may have depends largely on where you live.
Some states like California, Indiana, Maryland, New Jersey, and Texas have passed laws aimed at developing guidelines and regulations for mold in indoor air. In addition, some municipalities, like New York City have have enacted ordinances related to mold.
If you live outside of Georgia and are seeking information on mold rules and regulations in your state, check with your state department of environmental protection or your state department of public health. For local mold-related rules, contact your city manager or mayor’s office or local health department. Click here for a useful website to find state and local governments online.
There is no federal or Georgia law establishing permissible levels of mold indoors. There may be local laws, but state environmental officials say these codes generally do not contain or enforce mold standards.
So, as a renter it becomes vital to read your lease, and know your general rights as a tenant. When you lease a home, landlords normally provide tenants with a mold addendum.
It goes into how to avoid mold, what to do if you see mold, who to report it to, etc. Sometimes landlords are responsive, and sometimes they’re not.
Considering the above information, the guidelines below will help you resolve any dispute you may have with your landlord, particularly if you have a mold concern.
- Mold is caused by moisture, so the most important action you can take is to report any potential sources of moisture, including water leaks from the ceiling, under the sink, in your bathroom, etc. It is also very important that you report any water stains on walls or ceilings that could be indicative of a leak.
- Once you report the concern, document it with written records and pictures. Keeping proper records is essential. Hopefully, the moisture concerns will be addressed in a timely and professional manner by your landlord.
- If mold begins to grow, report this to your landlord and properly document the mold complaint with pictures and a written letter documenting your concerns. A paper trail is essential.
- Also, if you think the mold is making you sick, begin to document your health issues. When did your health begin to deteriorate? When did you start seeking medical attention? How much have you spent on prescriptions, doctor visits, etc.? How many days have you been off work? Document your medical condition from when you began getting sick and track all costs, time off from work, etc. to build your case, in the event you need to seek legal remedies.
- Once your complaints are filed with the landlord, it is up to the landlord to fix the problems and if there is mold have it professionally removed.
- If your landlord ignores your request, delays too long or doesn’t take adequate action to solve the problem, you may have legal remedies.
- Your next step is to contact your local and state governments, contact your health department, and find out if there is a local tenants’ union or other consumer rights organization dealing with landlord tenant issues in your area. Before you contact an attorney, do your due diligence and try to use all existing dispute resolution systems in place in your city and state.
- If all else fails, contact an attorney for assistance.
You may need to prove that there is mold in your apartment which may mean that you need to pay for a mold inspection or indoor air quality test.
In addition, it is important that you do not withhold rent, move out, or take further actions until you get proper advice from your attorney.
Hopefully, the information above is a starting point. Listed below are helpful resources to seek out further information and guidance if you have mold in your apartment.
Georgia Resources To Seek Out Further Information and Guidance If You Have Mold In Your Apartment
- Georgia Legal Aid: Georgia’s guide to free legal information and legal services, including answers to whether landlords are responsible for repairs.
- Georgia Landlord Tenant Handbook: This guide is published by the Georgia Department of Public Affairs
- National Conference of State Legislatures: Search for environmental laws in yours, or surrounding states.
- UGA Cooperative Extension: Read what University of Georgia experts have to say about mold.
Questions? We are here to help and guarantee all of our work. If you have a mold or air quality concern that you think is adversely affecting the health of your family call us, 678-697-6267 or send us an e-mail.

